

 |
| Isn't my little model adorable? She likes to cut her own hair. |
Two pieces of flannel. Cut them so one piece is 10 inches shorter than the other, both in length and width. For example, if your larger piece is 42" x 62", your smaller piece should be 32" x 52".
Steps:
1. With pins, mark the middle point of all four sides of both pieces of flannel.
2. Pin the two pieces of flannel right-sides together at the middle points. Now pin the fabrics together, starting at the center points and working out to the corners. Expect extra fabric to be showing at the corners. This is how it's supposed to be!
3. Sew each side: I use 1/2 inch seams when sewing with flannel. Sew each of the 4 sides, stopping 1/4 inch from the corners. On one of the sides, leave a 6" opening which you will use later on to turn your blanket right-side out.
 | ||
| (step 3) This is what your corners will look like. |
 |
| (step 4) The black dotted line is your seam from the previous step. |
5. Sew a seam that STARTS at the end-point of the black dotted line and ENDS at the fold, making a 90 degree angle where it hits the fold. Clear as mud, right? The picture will help you out.
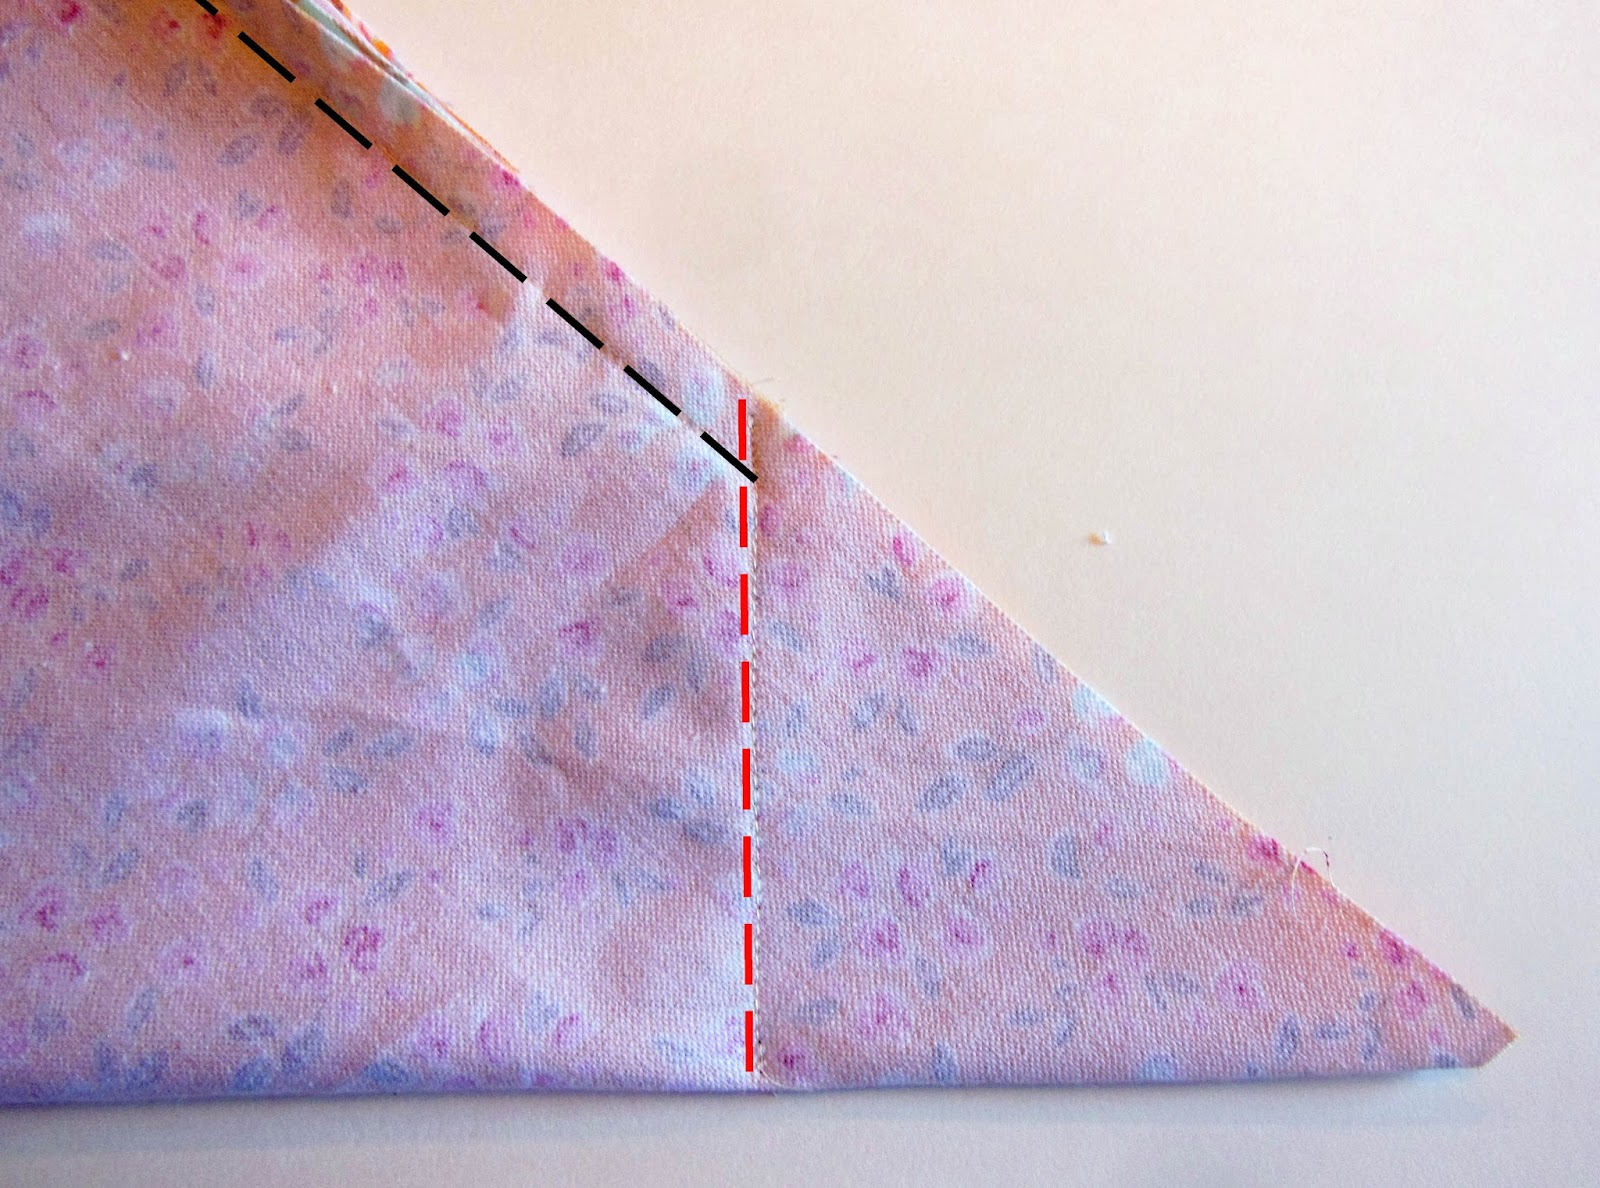 |
| (step 5) The red dotted line is the seam you sew in step 5. See how it makes a 90-degree angle with the fold? |
 |
8. Turn your blanket right-side out. Put your hand inside the blanket and use your fingers to work the corners out so they are nice and pointy. Sometimes they are a little stubborn.
9. Iron your blanket.
10. Top stitch the rectangle where the two fabrics meet. Be sure to stitch the opening shut.
Thank you to Riley Blake Designs for providing the gorgeous flannel from the Chatsworth collection!

Adorable! Thanks so much! I love how this turned out!
ReplyDeleteThis comment has been removed by the author.
ReplyDeleteThis is an awesome tutorial!!! What a cool way to make a bound blanket, without a bunch of craziness!!! Your directions are fantastic!!! THANKS for sharing... I am going to make afew of these! I found some gorgeous flannel at the beginning of hte season and wasnt sure what I would use it for...now I KNOW!! and what an awesome cause you are donating to, as well...that is really cool!!
ReplyDeleteDoes it have to be 10 inches difference in sizes? Will 6 inches work?
ReplyDeleteYes 6 inches would work. It will make the binding an inch and a half instead of two and a half.
ReplyDeleteI am new to sewing and trying to understand the math. With 10", which is 5" on each side, and a 1/2" seam sewn, wouldn't that be 4.5" boarder on ea side? I am not understanding how you got down to the 2.5" on ea side. Thank you, in advance for your help!
ReplyDeleteWhen you fold the bigger piece over it makes like a pocket which makes the 5-inch half the size equaling the two and a half inches when finished. (Reference the first picture see how it's folded) Hope this helps. 😃
DeleteThank you for the great instructions, I hope it will work with fleece.
ReplyDeleteThank you for this video I have sewed for years and I've done hundreds of alterations for formals and weddings but not much of making blankets or quilts or little throws. I got asked a few months ago to make a blanket for a little boy turning four. I've been really busy gotten behind and probably procrastinated.. I've got about a week and a half till his party and I think this idea will be able to get the project done in a snap thanks
ReplyDeleteLearn more: What is Flannel fleece? —The flannel fleece was a type of fabric made from polyester. Blankets made of polyester flannel fleece are easy to care since the flannel blankets are cozy, anti-fade, fade resistant, anti-pilling, wrinkle-free, and no shedding. Further, flannel blanket manufacturer
ReplyDeleteWhat is the final measurements of this blanket?
ReplyDeleteHi! I was wondering, would this work with minky/cuddle fabric? I am thinking it would, just wondering if you had any input or experience with it! Thanks!
ReplyDelete2.5x2=5 for border. 0.5x2=1. So six inches difference would lay flat. With ten inches the inside fabric would be two inches larger on each side. Am I missing something?
ReplyDeleteCan I do a batting inside to make it a quilt?
ReplyDeleteWhat yarn are you using since this one is discontinued? Thanks. custom minky blanket
ReplyDeleteI made this but all for sides are not the same width why how can I fix this?
ReplyDeleteI'm having a hard time with the math tonight. If I want the finished size to be 38x48 and the flannel is max 42in wide...what size pieces do I need? 32x42 & 42x52?
ReplyDeleteCan I use a 32 by 30 and a 42 by 40 for a self binding blanket?
ReplyDeleteWonderful
ReplyDeleteI think you would want to stop 1/2 from the corner since you are using 1/2" seams.
ReplyDeleteI don’t know if you ever check this post or see these comments this far after, but I wanted to let you know that I make this blanket for every new baby and it is so easy and beautiful and always loved🥰
ReplyDeleteWill 40” x 29” work for self binding rectangular blanket
ReplyDelete