Showing posts with label tutorial. Show all posts

Tuesday, December 22, 2015

Easy Doll Rag Quilt & Pillow Tutorial


I’m happy to participate in the Riley Blake Stitch 'n Kitchen Holiday Blog Tour! During the month of December, several bloggers are sharing fun holiday projects, some gift ideas, and favorite recipes. The tutorial I'm sharing is a great gift idea!

Project Details:

This super cute and cozy doll rag quilt is the perfect gift for little girls. It works especially well with 18-inch dolls. Add in the coordinating raggy pillow, and you have an adorable set!

Finished Size - Quilt: 19” x 19”, Pillow: 7.5" x 4.5"

Here is the "Recipe" for this quilt and pillow:

Ingredients:

  • 8” of 6 flannel prints for quilt (or 1 Fat Quarter of 6 prints). We used Riley Blake's Chatsworth Flannel. Visit www.flannelqueen.com to view our great selection of flannel fat quarter bundles.
  • Two 9”x6” pieces of flannel fabric for pillow
  • Stuffing for pillow (poly fiber fill)
  • Coordinating thread
  •  Fiskars Rag Quilt Snips (optional) or scissors

Baking Time:

I completed this project in a day! 

Quilt:

(Use 5/8th inch seams)
Step 1. Cut twelve 4” squares of each of the 6 prints.
Step 2. Set up blocks: match up each square with another square of the same print, wrong sides together. Since you have 12 squares of each print, once you match up your blocks you will end up with 6 blocks of each print.

For this quilt, we are using this pattern, where each number corresponds to one of the fabric prints:
 1  2  3  4  5  6
 6  1  2  3  4  5
 5  6  1  2  3  4
 4  5  6  1  2  3
 3  4  5  6  1  2
 2  3  4  5  6  1


Step 3. Sew each row individually, starting with row 1: Take a block from print 1, match it up with a block from print 2, and sew along one side using a 5/8th inch seam. Please note that your seams will always face up in a rag quilt. If you are working with directional prints like stripes, pay attention to the orientation of the fabric so it will end up looking the way you intended.
Now that you have block 1 sewn to block 2, it’s time to sew block 3 to the edge of block 2. Then sew block 4 to the edge of block 3, and so on until you have finished the row.
Step 4. Using the chart to determine which fabrics to sew together, sew row 2 using the process described in Step 3. Sew the remaining rows using this same technique. Now you will have 6 separate rows.
Step 5. Sew row to row: Take row 1 and line it up with row 2, back-to-back. The bottom edge of row 1 will match up with the top edge of row 2. Sew the bottom edge of row 1 to the top edge of row 2. Remember that the seams face forward. As you sew, carefully use your fingers to press the seams open as you sew over them. This will reduce bulk (your sewing needle will thank you).
Match up row 3 to row 2, back-to-back. Sew the bottom edge of row 2 to the top edge of row 3.
Repeat this process until all of the rows are sewn together.
Step 6. Sew once around the entire perimeter of the quilt. This will hold it all together! As you sew, carefully use your fingers to press the seams open.
Step 7. Clip the seam allowance (make a cut perpendicular to the seam) about every ¼ inch. Take care not to cut into the stitching. Fiskars Rag Quilt Snips work very well in this step.
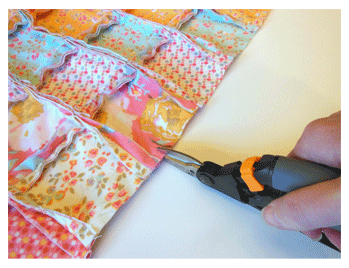
Step 8. Wash and dry the quilt. The first few times it is washed, it will shed quite a bit. It is best to wash the rag quilt and pillow separately from any other clothing or blankets. When it comes out of the drier, shake it outside. This will help dislodge some of the loose strings.

You’re done!

Pillow:

Step 1. Match up the two 9” x 6” pieces of fabric wrong sides together.
Step 2. Sew a 5/8th inch seam around the perimeter, leaving a 2” opening on one side.
Step 3. Stuff the pillow with enough stuffing to make it nice and fluffy. Make sure to work the stuffing into the corners.
Step 4. Sew the opening shut.
Step 5. Clip the seam allowance (make a cut perpendicular to the seam) about every ¼ inch. Take care not to cut into the stitching.
Step 6. Wash and dry the pillow. The first few times you wash it, it will shed quite a bit. It is best to wash the rag quilt and pillow separately from any other clothing or blankets. Shake it outside when it comes out of the dryer. This will help dislodge some of the loose strings.  

Bonus: Recipe

My husband’s grandma made the best sugar cookies. They are soft, not crunchy. I’m pretty sure I’ve eaten a zillion of them in my lifetime. Here’s the recipe:
Grandma’s Sugar Cookies
1 cup Shortening
2 cups Sugar
2 Eggs
1 cup Sour Cream
1 tsp Vanilla
½ tsp Baking Soda
4 tsp Baking Powder
½ tsp Salt
4 ½ cups Flour
Preheat oven to 350 degrees.
In a mixer, mix all wet ingredients together. Then add dry ingredients.
Roll dough out onto a floured surface. Use cookie cutters to cut desired shapes. Place on cookie sheet and bake for 10-12 minutes. Cookies are done when the edges BARELY start to turn golden. Frost cookies with your favorite frosting or icing.

Enjoy!


Friday, April 25, 2014

Tuesday, April 15, 2014

Riley Blake Designs Union Jack Pajama Pant Tutorial

A friend of mine mentioned she would love to see Riley Blake's Union Jack panels made up into a pair of pajama pants with each leg being a different print. I thought it was brilliant, so Miranda, this tutorial is for you!

Let's get started!
 
I decided to start with the basic Red, White and Blue panel, but Riley Blake came out with the cutest Pink, Purple and Yellow panels as well. I'm sure I'll be making more of these jammies in every color! 
Before cutting into the fabric, I decided to add a little visual interest to the solid red blogs by adding a few pintucks. To make pintucks, you need a pintuck foot and a twin needle. You can find a super easy tutorial for using your twin needle here. 
Here is what the panel looks like after adding the pintucks. It just gives the solid red a bit of texture and visual interest, but you could definitely skip this step.
Now you will want to find a pair of pajama pants or lounge pants that already fit the intended recipient. They should be loose-fitting. We are going for a very comfortable, loose pant here.
Fold your Union Jack panel in half lengthwise. Now fold the pants in half and lay them on the fabric so that the outer folded edge of the pant leg lines up with the fold of the fabric.
You are going to trace and cut around the pants, leaving extra room for your seam allowance. I left 1-2 inches around the sides and top, and 1/2" at the bottom. (My daughter's pants were already very long, so I didn't need to add additional length at the hem.)
Use your cut piece as a pattern to cut the second leg.
Stitch up the sides of your pant legs using a 1/2" seam allowance. I always serge the seam for a nice finish. You could also finish it with a zig-zag stitch. Leave the crotch-to-waist edges unstitched for now.  
Next, turn one pant leg right-side-out. You will have one pant leg wrong-side-out and one right-side-out. 
Stuff the right-side-out leg inside the wrong-side-out leg, matching up the crotch seams.
Now with your crotch seams lined up, stitch from the waist, down to crotch, and back up to the opposite waist. 
Turn the pants right-side-out. 
 For the waist, I am using 1" elastic, so I will be creating a 1.5" casing. At this point, you may want to try the pants on the intended recipient and make sure the waistband will fall where it is comfortable on him/her. My daughter wasn't worried about how baggy the pants were here because she likes to roll the waist, so I didn't make any changes to the crotch-to-waist measurement. If you don't like to roll the waist, you will need to adjust the crotch depth here.
To make the elastic casing, fold the raw edge of waistband over 1/4" and press. 
Now, because I am using 1" elastic, I folded the fabric over another 1.5" and pressed. If you are using a smaller elastic, just add an additional 3/8" to 1/2" to your elastic measurementFor example, for 1/2" elastic, I would fold the fabric over 1".
 Stitch 1/4" from bottom edge, leaving about a 2" opening where we will slide the elastic through.
To measure your elastic, simply take the measurement of where you want the waist to fall. My daughter wanted the waist to fall between her natural waist and hips, so that is where I took my measurement from. 
Grab a large safety pin and pin it to the end of your elastic. Begin threading the elastic through your casing, leaving a few inches of the elastic exposed. 
Now take both pieces of exposed elastic and, overlapping them about 1", stitch them together.  I use a rough zig-zag stitch. 
Work the elastic into the casing and stitch the opening closed with a straight stitch. Your waistband is now finished.
 For the hem, cut the pants to the desired length + 1/2". Fold the hem over 1/4" and press. Fold over another 1/4" and sew, using a straight stitch.
 Voila! You are done! This project can be completed in 30 minutes to 1 hour!

I am absolutely in LOVE with these panels because they are so versatile. I can see teens and college students tacking them straight onto the wall, however, this Blog Tour is giving me tons of ideas for finished projects.

Here is the schedule for the Blog Tour. Be sure to follow along for more great ideas!
Schedule:

Tuesday 4/1 – Paula at The Sassy Quilter


Thursday 4/3 – Jina at Jina Barney Designz


Tuesday 4/8 – Karin at Leigh Laurel Studios


Thursday 4/10 – Marni at Haberdashery Fun


Tuesday 4/15 – Julia at My Fabric Obession


Thursday 4/17 – Molly at Rose and Odin


Tuesday 4/22 – Amanda at Jedi Craft Girl


Thursday 4/24 – Madame Samm at Sew We Quilt


Tuesday 4/29 – Julia at Riley Blake Designs

Thursday 5/1 – Ginny at Darling Adventures