Showing posts with label retro. Show all posts

Friday, August 23, 2013

No-Sew Silhouette Fabric Picture - Video Tutorial


Julia just finished a video tutorial for Riley Blake that I'm sure you'll love! It's a no-sew silhouette fabric picture. She gives a step-by-step demonstration with many helpful tips. I love the versatility of this project. The possibilities really are endless. 


To see more Riley Blake video tutorials, visit their website: http://www.rileyblakedesigns.com/how-to-videos-new/

Tuesday, August 13, 2013

Purse to Hip Purse Re-Fashion

I have a business trip coming up that requires LOTS of walking.  I have learned from past experience that when I am on my feet for that many hours, I don't want to be carrying a purse, or anything on my shoulders and back, because they end up very sore, very quickly.

I do, however, need something to carry money, I.D., business cards, phone, etc., and I had something in mind, but couldn't find it anywhere in stores, so I made my own and I am going to show you how to do the same!  This is my very own Purse-to-Hip Purse tutorial.
 
*I apologize for the poor picture quality - I had to improvise with my cell phone today.

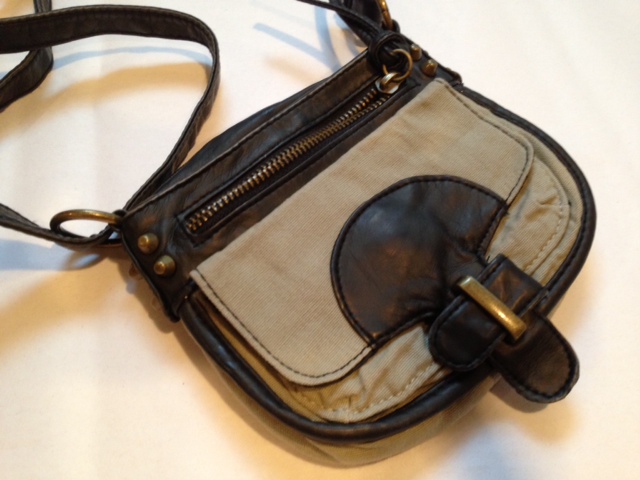
I started out with a small (about 6.5" x 5") cross-body bag. I found this at a major big box store retailing for about $16.99.


I took a pair of scissors and cut the straps, and the hardware holding the straps, off.


These straps are nice and wide - perfect for re-purposing into belt loops.  Simply cut 2 pieces, each about 5" long.  You won't need all 5", however it is much easier to have excess to work with, rather than not enough.


 Next, you will sew the top of the strap to the back of the purse toward the top.  I visually divided the width into thirds and placed each strap at my imaginary dividing line.  You don't want them too close together, or the purse will tip to one side when it is on your belt.  You also don't want them too far apart, or - I don't know what:) 

I have a vintage sewing machine made with all metal gears, which lets me sew through multiple layers with ease.  I was able to use this to sew the top portion of the straps down.  If you don't have such a machine, you will need to hand sew the straps to the bag, as a modern plastic machine won't be able to handle the thick layers of leather.


Next, I needed to hand sew the bottom portion of the belt loops because the purse was too tight of a squeeze for my machine.  To hand sew, I chose to use a heavy-duty Button & Carpet thread to ensure the belt loops stay on tight.  I also used a very thick needle that could handle sewing through canvas and leather layers.


I used the belt loops on my pants as a general guide for the size of these belt loops.  I didn't worry about the neatness of the stitching here because no one will see it, and let's be honest, it was brutal trying to sew through the leather!  

You can see on the right hand side, I still have excess strapping tucked underneath.  I simply took a pair of scissors when I was done sewing and snipped it off, leaving about 1/4".


Here is the finished Hip Purse.  So much better than a fashion-challenged fanny pack!


And here is one more....

This is a cute little aqua wristlet I found at the same big box store.  It doesn't have a strap I can re-purpose, so I had to improvise with ribbon.

I followed the exact same steps as shown with the first bag above, except I used this cute panda woven ribbon for the belt loops.

  
Finally, the little wrist strap was easily removed from it's latch hook and voila!  My new aqua-slightly-retro Hip Purse.


Thursday, July 26, 2012

Not Your Average Polka Dot Dress!

This dress...


...is not your average polka dot dress...


It is made with Riley Blake Designs Hot Pink Ombre Dot fabric.  LOVE!  Ombre is a French word meaning "shadow" or "shade."  Notice in this dress how the dots are very saturated in the center and then fade out to a lighter shade at the edges.  This is the ombre effect.  I mentioned in a previous post my newly rekindled love for all things Navy Blue.  Here I made a navy blue piped trim to contrast with this gorgeous, youthful pink ombre dot.  


I also added piping to the front sides and waistline to really give the garment substance, structure and POP!


For this dress I used a vintage Simplicity 3811, circa 1950.
The tricky part when working with separate front, side bodice, and skirt pieces, while using a fabric that fades in and out like this was making sure to allow for the seam allowance on the skirt and bodice so that the fading/shading matched up just right with the center front piece.  It was important to match up the shading on the sleeves as well.


Ooookayyy, It seems our little model is done now - silly girl!  What do you think?  Now I'm thinking how cute this dress would be in orange...or aqua...or green...all paired up with navy blue trim, of course!


My shop is well stocked with this lovely ombre, so pop on over!


Tuesday, July 24, 2012

I Gave You a Sneak Peak...Here's the Finished Dress

I made this cute little dress for the Riley Blake Designs booth at Quilt Market.  It is taken from a circa 1950's pattern, but completely updated using this fabulous navy blue Chevron print paired up with a contrasting lime green waistband.


The waistband was looking a little plain to me, so I whipped up this cute little fabric flower using Sara's super easy tutorial.  The flower will fray around the edges a little each time it is washed.


I have to say, I have rekindled my love for Navy this year.  I love seeing it paired up with Orange, Gray, Lime Green, Pink, Aqua, Yellow.....just about anything!  It seemed to fall out of style for awhile, but now it's back with a vengeance!  Go blue!


Tuesday, February 7, 2012

Simplicity 3728


I thought I had lost my creative mojo for good these last few months, but I think it's back!  My youngest begged me to make her a new dress, so I reluctantly dragged myself to my pattern stash and pulled out this vintage Simplicity 3728 pattern.

At first glance, it's not so cute, but I knew that dress hiding under the apron-thingy in View 2 was exactly the dress I was looking for. 
 

I decided on this adorable Green Meadow floral print from Sarah Jane's Children at Play collection.  For the collar I chose some good quality muslin I had on hand, and for the sleeve binding I used simple store bought bias tape.


The back called for a button closure, which I think adds to the charm of the dress so much better than a zipper in this case. (Yes, I know the white thread clashes with the red buttons - I was too tired to worry about it at that point:)


I think she likes it!  And I'm now thinking of more projects I can start working on - yes, I think I got my mojo back!


Saturday, July 2, 2011

One Pattern - Two Dresses

So, I dug up this vintage 1960's Butterick 3056 pattern from my stash & decided to make it for little T - just because:)  I couldn't decided whether to make it in a solid or a big, mod print - so I decided to do both!  I loved seeing how the fabric & trims I chose completely changed the dress!


This first dress I made from Riley Blake's Sea Breeze fabric. 


I added brown piping around the collar, took out the front tabs called for in the pattern, and instead added brown ric rac up the front and back seamline, & a brown polka dot bow at the top of the pleat, topped with 4 matching vintage buttons.


She loved it!


Next up, I picked this very mod Gray & Citron daisy print from Michael Miller.


I felt like it would be too busy if I did the sleeves in the same fabric, so I instead opted to make them out of Michael Miller's White Cotton Lawn fabric.  I also made the collar out of the cotton lawn.  On the collar and sleeve cuffs, I added a 1/4" yellow ric rac.  I did add the front tabs to this dress, along with some big, white buttons to add to the 60's feel of it.


I decided to add a contrasting Citron Polka Dot to the pleat inset as well.  You can see it in the photo below.


In the end I was really happy with both dresses.  The simplicity of the solid with the contrasting ric rac gave the first dress a very youthful, innocent feel.  The second dress has a similar feel, but with a lot more "pop"!  

When choosing fabrics, it's always good to think about how it will look and come across in the finished garment.  In my opinion, children's clothing shouldn't overtake or drown the child in a bevy of colors, ruffles & bows, but rather they should highlight the child's natural beauty and innocence.  With so many beautiful prints out there, it's a good idea to reign ourselves in - use solids to break it up and give the eye a resting place - and keep it simple.  Happy Sewing!


Monday, May 23, 2011

McCalls 6697 Girls Pajama Set

I finally got around to making little T this cute pajama set!  She loves when I make her cotton nightgowns, which are so hard to find nowadays, and I probably still will make her one, but this pattern was just screaming to be made from Riley Blake's Daydream fabrics.  The soft, buttery colors had retro p.j.'s written all over them!

I used this 1960's McCall's 6697 pattern:

Here is the finished product:


Okay, so my kids can only last so long with the picture-taking thing:)

I stuck pretty closely to the pattern.  The only things I altered were making the yoke, pockets & button facing all out of the coordinating floral fabric.  I also scrapped the neck facing and instead made my own bias tape out of Daydream's Sea Breeze fabric.  I think when making kids clothes, less facing is more.  They don't like the clothes to feel "weird" or complicated in anyway.  And the more the item looks store bought, the more likely they are to wear it:)


The bias tape is super easy to make.  I'll try and make a tutorial for that soon!

Pattern: McCalls 6697 
Fabric: Riley Blake Daydream Collection - Coral Dots, Coral Petit Floral, Sea Breeze Solid
Level: Intermediate
Summary: Pattern was clear & easy to follow.  Finished garment turned out just as I hoped.  100% satisfied.


Sunday, May 8, 2011

Vogue 5253 Dress


So my 14 year old told me she has no Sunday clothes that fit her. She came close to regretting those words. You see, my poor 14 year-old has a love/hate relationship with my creative moods. And right now I'm in a creative mood -- so why go buy a dress when I can sew one -- using a vintage pattern no less?

This is where the love/hate thing comes into play. As any seamstress knows, sometimes the patterns turn out beautiful, great fitting clothes, and sometimes, well not-so-much. The problem is that it takes time for me to admit defeat when my creation doesn't work out. Then I get annoyed that she doesn't like it, and she gets annoyed that I'm being unreasonable......

The poor girl was probably having an inner freak-out when I pulled out the above pictured pattern. It's a circa 1950's Vogue 5253 pattern. Isn't it cute? This child, however, doesn't like "cute." I know she thought it looked far too juvenile for her tastes, but being the visionary seamstress that I am, I could picture this made up in a simple dot fabric that would be perfect, and not too juvenile, for summertime.


Well, was I right or was I right?! How cute -or not cute- is she?!


We decided to add a black belt and she can wear a little black sweater currently residing at the bottom of her dirty clothes basket. She wants me to take in the darts about 1/2", so the bodice is a little more fitted, which isn't a problem.


Hooray for success!!! Do you have any idea how hard it is to please this child? And this is where she tells me that I'm pushing my luck & I'd better put the camera down or there will be mutiny....

Fabric: Red Contrary Dots by Riley Blake Designs
Pattern: Vintage Vogue 5253

Binding: Joann's 
 Belt: Target

Monday, April 11, 2011

Sewing Vintage 1960's


After being in a creative slump for nearly a year, I think I'm getting my mojo back! Hooray! I started cleaning/de-stashing my sewing room this weekend and dug up this cute little sewing pattern from the 1960's. It's Butterick 9911.

T. "needs" another Sunday dress, so there was my excuse:) I used the Cream Polka Dot from Riley Blake's Daydream collection. It's really a lovely Butter Yellow. Perfect for Easter.


I liked this pattern a lot. The midriff was something I've never done before & it was fun learning a new technique. I got too impatient to photograph the midriff assembly, but here are a few photos from construction.

I chose to sew View B, which has the lovely Bateau or Boat Neckline. Normally I do a lot of top-stitching in order to give my finished garments a clean, crisp edge, but I didn't think it would look just right with this dress, so I opted to understitch the neckline.


This basically means you are stitching the facing and seam allowance together. Very clear, I know. Check out Collette for a great little tutorial on understitching. The top will look like this...


This dress came together in an afternoon and little T. loves it! She wants to wear it 24/7. I like it, but I'm not sure if I LOVE it. The midriff is the part I'm unsure about. Maybe I should have kept it all one fabric. Maybe I should have left out the hanging sash. Not sure.

Also, one thing you learn with these vintage patterns is that the pictures always show VERY poofy skirts, when in fact the finished products are a much toned-down version of the artists interpretation.